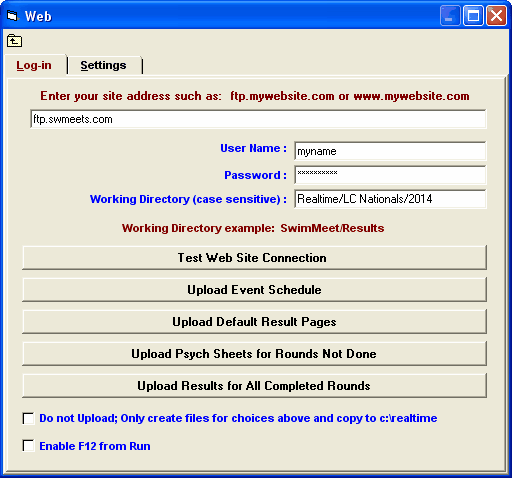
Click on Run from the Main Menu Bar and then click the Web icon ![]() to display the Web Log-In and Settings window.
to display the Web Log-In and Settings window.
Log-In
•Enter your ftp site address, such as ftp.mywebsite.com or www.mywebsite.com. The address usually must begin with ftp. in order to connect correctly. However it is possible www.mywebsite.com could be the address to use. You will need to check with your web site administrator to find out what they recommend or you can experiment with the address and use the Test Web Site Connection button to see what works and what does not work.
•The web site must NOT be anonymous which means the site must have a User Name and Password which you enter in the Web window.
•Enter the name of the Working Directory that has been set up on the web site you are using. An example of this directory name would be Meets/Results where the slash is a forward slash. This web server working directory name will be used by MM Pro as the location to ftp and store the Real-Time Meet Results files.
| 1. | The Working Directory must already be created on the web site before uploading. MM Pro will not create folders. |
| 2. | The Working Directory cannot have any spaces in it. |
| 3. | The Working Directory cannot be blank. |
| 4. | The Working Directory is case sensitive as is the User Name and Password. |
| 5. | The Working Directory should never have a slash as the first character and only forward slashes should be used to separate folders. |
•Clicking Test Web Site Connection simply tests to see if MM can connect to the web site with the given address, user name and password. As soon as the connection is made you get a message box saying successfully connected or not. Right after that, the connection is closed. In fact, after each session of uploading files, the connection is closed to prevent time-outs and other potential connection issues.
•Upload Event Schedule means upload the Main html page and the Event Index containing every event in your meet based on your choices in the Settings tab.
•To upload default pages for each event, click Upload Default Result Pages. You should do this for sure the first time you load the event index, otherwise users will click on an event and get a "Page cannot be displayed" message.
•You only have to upload the Event Schedule one time. But if for some reason that list changes, you can upload the new event list as many times as you wish. However, many users upload the event schedule ahead of time and alter it to include a team logo or other information. If this is the case, do not re-upload the event schedule as it will overwrite the pages with the logo.
•After uploading the Default Result Pages, you could use Upload Psych Sheets for Rounds Not Done. If the event is not seeded or the round is not seeded, it will upload the Psych Sheets. When making this selection, you will be given the option to pick one session or all sessions.Heat sheets cannot be uploaded.
•If you get behind or want to be sure you have uploaded all results, you can use the Upload Results for Completed Rounds. When making this selection, you will be given the option to pick one session or all sessions.
•If you want to create the html files for Default Result pages, Psych Sheets, or Completed Results and NOT upload them, check the Do not Upload; Only create files for choices above and copy to c:\realtime check box. The html files will be copied to your c:\realtime hard drive folder. Maybe you want to ftp the files later using your own ftp software and this allows you to do that.
•Click the Enable F12 from Run check box so that when you press F12 from the Run Menu, Real-Time results will be uploaded to your web site. Otherwise, MM will store the heat and meet result files in the c:\realtime folder on your computer and will not upload the files to the web site. Note that this has no effect on the check box on the Log-in panel for Do not Upload; Only create files for choices above and copy to c:\realtime.
•The layout of the heat sheet and result pages is determined by the Web Preferences in Run / Preferences / Web.
